FIREWOOD OR TREASURE?
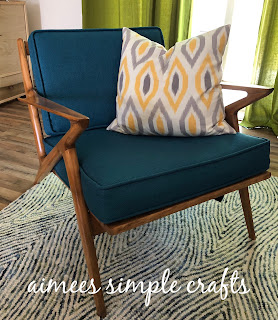
Update: Here is the finished chair. Custom cushions were purchased and it works perfectly in my daughter and son-in-law's mid-century modern style living room. It truly was a treasure!
Original post: Behind a garage, covered in years of dust, dirt and decay, beneath old pieces of wood and sun beaten tarps, a piece of wood caught my eye. I dug through the layers and pulled this out of the debris:
At first glance I thought it was some sort of lawn chair. But looking more closely, it resembled a mid-century modern chair that my daughter and son had been given. I decided to cart it home and take a second look.
The design intrigued me - I have no knowledge of furniture styles, eras, etc. - but this was pretty cool. No screws or nails. All the pieces came apart with little or no prodding with a mallet. Even the rails on the back of the chair pulled out into seven individual pieces. When sanding (lots of sanding!!), the old finish came off after awhile, most of the black discoloration disappeared and it actually looked like wood. Oak? Teak?
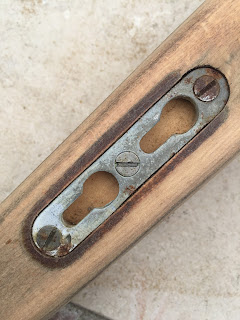
The brackets were very cool... but we puzzled over the slots for the seat area.
After some internet searching, we were able to find out how, without any staples or screws, the webbing for the seat was installed. After putting a coat of varnish on the chair, we looped individual pieces of webbing through the slots and locking them in as we pushed down on the seat. Amazing chair!
My daughter will eventually get seat cushions for the chair they were given, and now they have two! Can't wait to see the final results!
Take the time. Put in effort. It will be well worth it.
Original post: Behind a garage, covered in years of dust, dirt and decay, beneath old pieces of wood and sun beaten tarps, a piece of wood caught my eye. I dug through the layers and pulled this out of the debris:
The design intrigued me - I have no knowledge of furniture styles, eras, etc. - but this was pretty cool. No screws or nails. All the pieces came apart with little or no prodding with a mallet. Even the rails on the back of the chair pulled out into seven individual pieces. When sanding (lots of sanding!!), the old finish came off after awhile, most of the black discoloration disappeared and it actually looked like wood. Oak? Teak?
The brackets were very cool... but we puzzled over the slots for the seat area.
After some internet searching, we were able to find out how, without any staples or screws, the webbing for the seat was installed. After putting a coat of varnish on the chair, we looped individual pieces of webbing through the slots and locking them in as we pushed down on the seat. Amazing chair!
My daughter will eventually get seat cushions for the chair they were given, and now they have two! Can't wait to see the final results!
Take the time. Put in effort. It will be well worth it.


Comments
Post a Comment
Please feel free to comment - I would love to hear from you!