CRAFT PROJECT INSTRUCTIONS
Cute Clipboards


Patriotic Wreath
Vine wreath


Oh My Gosh! Simple Signs!

Sheet Music Paper Roses


For this project I bought regular old clipboards from Staples. The first step is to make a template for the top. That was probably the most difficult part because of the clip. I saw somewhere that if you tie the clip OPEN, it makes it easier to trace around it and with some strategic cuts, you'll get a one piece pattern.
I bought some coordinating 12" x 12" scrapbook paper to cover the front, but the clipboard is longer than that. I pieced it together so that everything was covered but still pretty.
Mod Podge the clipboard, then stick the paper on top. Mod Podge each decorative feature and then put a coat over the whole thing. Let it dry and do another coat.
To add the fiber just cut a piece twice the length you want, fold it in half, stick the fold through the hole, slip the ends through the loop and pull tightly. Do this as many times as you like.
Patriotic Wreath
You will need:
Vine wreath
Fake greenery (is there any other way to say it?)
Two small flags
Burlap
Floral wire
Wood or ceramic blank sign
Hot glue
Twine
This wreath is pretty simple to make. Here are all the fixin's:
Start by pulling apart the greenery.
Glue it evenly to the top of the wreath.
Make a bow out of the burlap. I just twisted it around until it looked okay. I tied it together with wire and glued it to the top of the wreath.
Using whatever color of paint I had on hand, I painted the "WELCOME" on the sign. I thought about buying a piece of wood, spraypainting it with chalkboard paint and then use white paint to do the lettering. This ceramic one was only $1 so that worked out great. Plus it had a jute hanger, so I just cut it and tied it to the wreath.
Take your hot glue gun and just go to town! Glue everything down and if it's too heavy, use the floral wire to secure it. I hot glued the flags in place and then just wrapped a bit of twine around the bottom of the wreath.
All in all, this shouldn't take much time to make! I think I spent more time wandering the aisles of Michaels!!
You will need:
An old frame or piece of wood
Chalkboard paint
Chalk
Pencil
Acrylic paint and small brushes
Piece of soft cloth
Print up a picture or a Word doc with what you want on your chalkboard. 'Draft" format is fine if you want to save printer ink.
Take a piece of chalk and rub it vertically across the entire back of the paper. Then rub it horizontally across the back. Shake off the dust. Put the paper (chalk side down) on top of your blackboard surface and trace the design with a pencil. It will transfer the design (in chalk so nothing is left behind!!) to your blackboard.
Using a tiny brush and acrylic paint and using your original design to guide you, paint your surface. If you make a mistake, just take a wet Q-Tip and remove the paint. Be careful that your sleeve or hand doesn't erase the chalk. Turn your surface to make painting easier. If you want shading, just add water to your paint and shade the sides of the letters after they dry.
An old frame or piece of wood
Chalkboard paint
Chalk
Pencil
Acrylic paint and small brushes
Piece of soft cloth
Print up a picture or a Word doc with what you want on your chalkboard. 'Draft" format is fine if you want to save printer ink.
 |
| Printer copy of a design that I wanted to re-create |
Take a piece of chalk and rub it vertically across the entire back of the paper. Then rub it horizontally across the back. Shake off the dust. Put the paper (chalk side down) on top of your blackboard surface and trace the design with a pencil. It will transfer the design (in chalk so nothing is left behind!!) to your blackboard.
 |
| Basic design in chalk on the surface |
 |
| Finished board before covering it all with chalk. |
 |
Note the shading on the sides of some of the letters.Rub chalk over the entire surface, wipe it with a soft cloth, put it in the frame (if you used the glass) and you're done!
Here's another example:
 |
| Tracing with chalk |
 |
| Painting and a little bit of shading |
 |
| Pop it in a re-purposed frame and it's done! |
Sheet Music Paper Roses
To make the roses, you will need:
Paper of any kind - the manufacturer's purpose for the punch was for scrapbooking paper, but I think any paper would work. I used sheet music.
EK Success Carnation Punch
Hot glue
Chopstick, knitting needle or other instrument of that type to roll up the strips of paper.
Directions:
Use the punch to make strips of paper. It takes about 4 strips for each flower.
Offset two strips to begin.
Start winding them around whatever tool you're using. Add a dab of hot glue now and then to gold it all together as you work.

When you are done, hot glue the bottom of the flower.
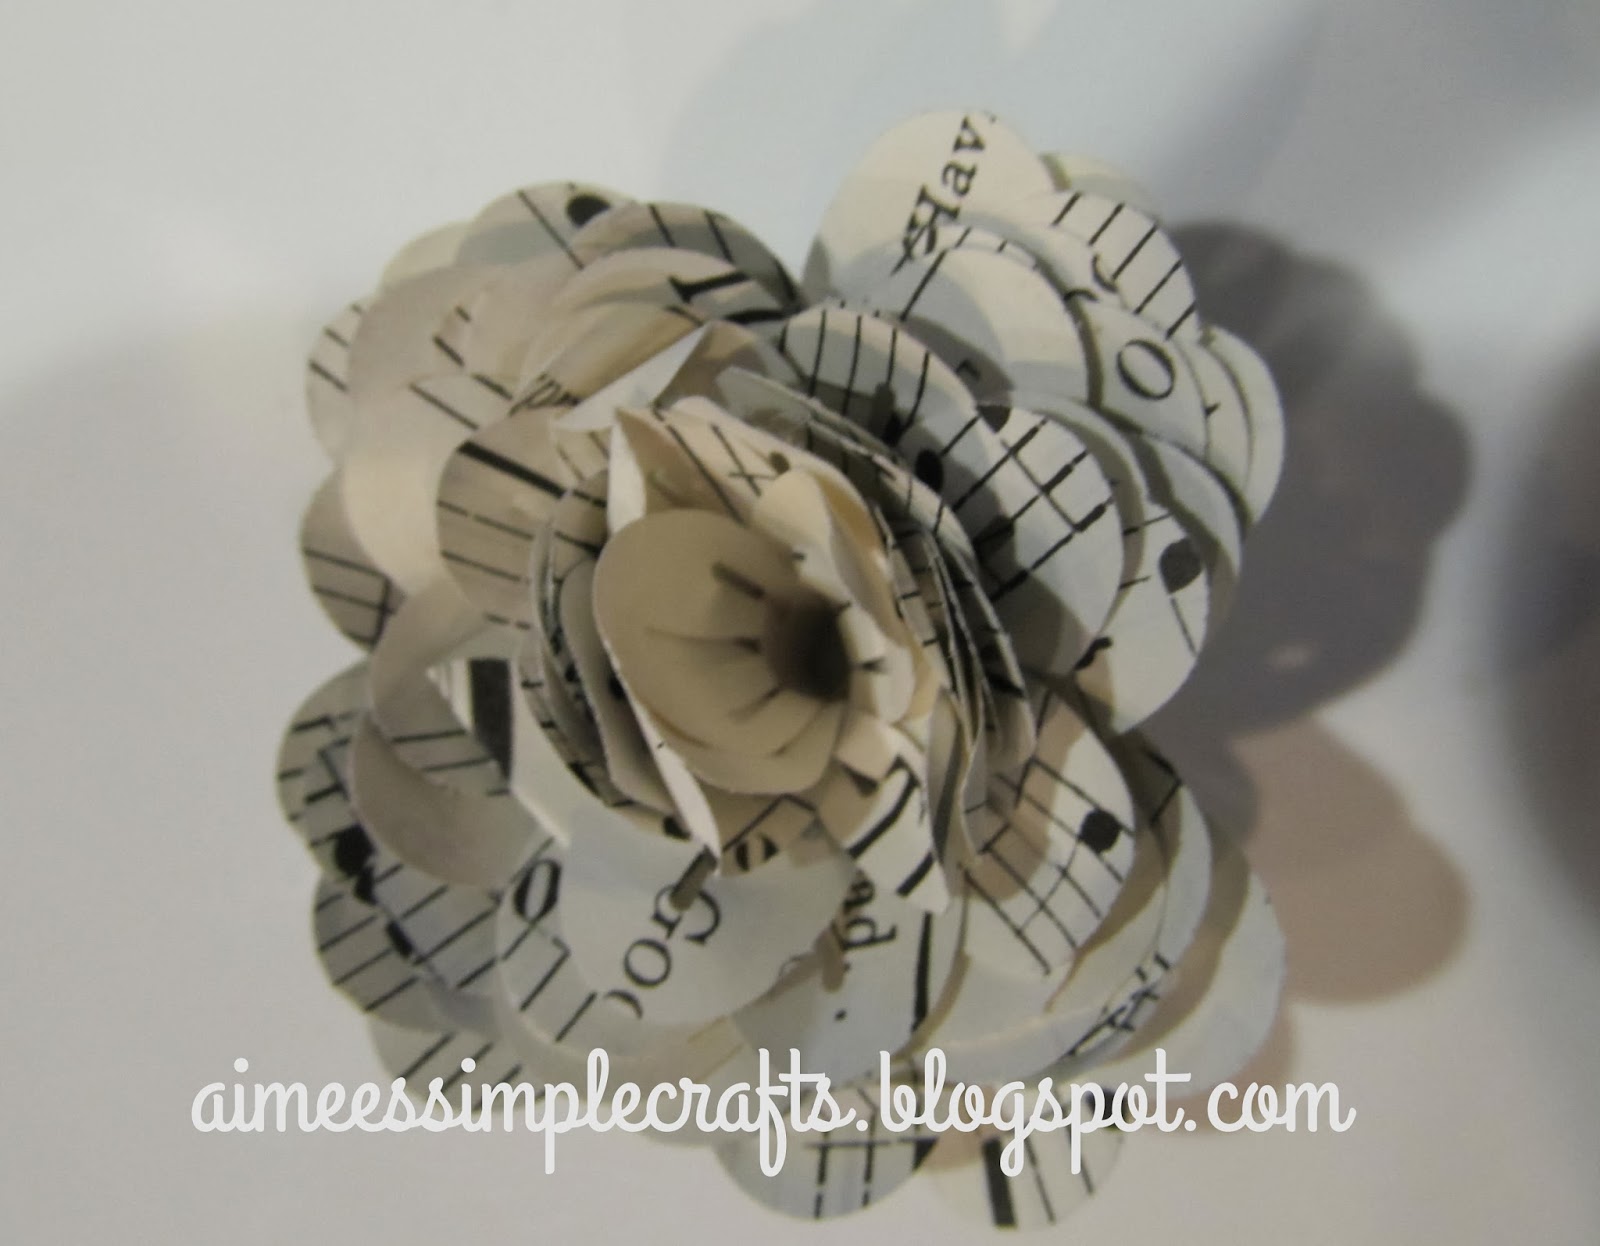
Glue a few together with a ribbon to make great decorations! I'll post my wreath if and when I finish!!

All You Need Is Love Clipboard
This is a simple project that you can complete in a very short amount of time. Here are the supplies you need:
1x8x18" pieces of wood (or any size you prefer)
Blackboard paint (I used the brush on paint for this project)
Stencils
Light colored acrylic crafter's paint
Very small, pointy paintbrush
Twine
Small nails or brads
Clothespins
Letter stamps (I found my set at Walmart for $1.50)
Hot glue
Directions:
Sand and paint the boards. Allow to dry.Season the chalkboard paint by rubbing the side of a piece of chalk all over the surface and then wiping it off.
Practice with the stencils on a piece of paper the same size as your board to determine placement. You can tape it to the board below where you want to stencil and center it.

Using your stencils, pencil the letters on the board. Paint in the lines.
Stamp on your clothespins (or cover with scrapbook paper, or paint, or whatever you desire!)

Space the clothespins across the bottom of the board and hot glue them.

Run a piece of baker's twine through the holes in the clothespin springs.

Nail in the brads and tie the twine to them. Add a little hot glue to hold the twine. I made little bows as well.

Repurposed Succulents
I used the succulents that I had purchased for the pumpkin decoration, but you can purchase them or take cuttings from your garden. You can use any container that you like. I used the glass containers that were left over from burned down to nothing Glade candles. After cleaning them up, they were perfect!! Fill the container with potting soil and moisten. You can add some moss to the top. Just stick in your cuttings and spray with water. Mist fairly often.

Ornament Wreath
This simple wreath is inexpensive and easy to make. Check out the original post from Live Love DIY (link in original post).
You will need:
Lots (lots!!) of plastic cheapie ornaments - Walmart has a great selection!
Wreath form - I used an extruded foam one from Michael's
Hot glue
Ribbon (optional)
Pliers (to remove the tops of the ornaments)
First off, remove the tops of the ornaments.

Hot glue ornaments to the center. I used all large ones, but if I were to do it again, I'd mix it up a bit and use medium sized ones too. Make sure the little stems are pointing up.
You will need:
Lots (lots!!) of plastic cheapie ornaments - Walmart has a great selection!
Wreath form - I used an extruded foam one from Michael's
Hot glue
Ribbon (optional)
Pliers (to remove the tops of the ornaments)
First off, remove the tops of the ornaments.
Hot glue ornaments to the center. I used all large ones, but if I were to do it again, I'd mix it up a bit and use medium sized ones too. Make sure the little stems are pointing up.

Next, glue ornaments (with stems up) to the outside.

Turn
the wreath over and start covering the entire form with ornaments. I
glued a piece of wired ribbon to the top so I could tie it to my china
cabinet.


Fall Succulent Pumpkin Decoration

Materials Needed:
Pumpkin - the most bumpy, weird colored one you can find!
4 - 5 different succulents - I got mine at Home Depot for about $2 each
Pumpkin - the most bumpy, weird colored one you can find!
4 - 5 different succulents - I got mine at Home Depot for about $2 each
Sphagnum moss
Glue gun
Spray adhesive
Optional - small garden elements such as pinecones, small sticks, etc.


Directions:
1. Spray the top of the pumpkin with the adhesive.
2. Cover the top with the moss. I brushed off the excess, sprayed it a second time and then put more moss on.

3. Start your arrangement by cutting off a piece of a succulent - one of the larger ones. Hot glue it a little behind the stem and off to one side.

4. Continue to glue your cuttings one by one in a pleasing arrangement.
5. Glue in the other elements as needed, or just keep it to succulents.

6. Periodically spray with water.
V-Stitch Baby Blanket

Materials Needed:
1 large skein of Baby Sport Yarn.
Size H/8 or 5mm aluminum crochet hook
1 large skein of Baby Sport Yarn.
Size H/8 or 5mm aluminum crochet hook
Gauge: 4dc=1"
Yarn Thickness: 4mm
Finished Size: 28"x30"
Skill Level: Intermediate
Instructions:
ROW 1: Ch 100. Sc in 2nd ch from hook and in each ch across. Ch3, turn.
ROW 1: Ch 100. Sc in 2nd ch from hook and in each ch across. Ch3, turn.
ROW 2: Sk first sc. Dc in next sc. Sk next 2 sc. Dc, ch1, dc in next sc (v-st made). Sk 2sc. *V-st in next sc. Sk 2 sc. Rep from * across. Sk next 2 sc. Dc in each of the last 2 sc. Ch3, turn.
Continue until blanket is the length you like.
Embossing/Stamping
If
you want to give embossing a try, I'd suggest buying an embossing heat
gun with your discount coupons. It's pretty inexpensive. I'd recommend
using "pigment" ink because it will stay wet longer than ink from a
regular ink pad. Whatever color the ink is, that's what will come
through (I like the clear embossing powder).
First I chose my stamps:

Got my embossing supplies together - inkpad, powder and plastic spoon for sprinkling:

Stamp the image and cover it with embossing powder:

Shake
off the leftover powder that didn't stick (I shake it off on to a piece
of paper and then pour it back in the powder container). Then, using
your embossing tool, heat the image until the ink is puffy and glossy:


When you emboss an image, it won't smear. I love using watercolor paints to add some interest to the image:


I
added a strip of scrapbook paper, a stamped and embossed "Thanks" to
the front, and a stamped and embossed "for all you've done" on the
inside. I used mounting tape to adhere the stamped tag to the front of
the card:

I added some twine - tied a bow at the top of the tag - and voila! Done!

Small Paper Banner
I used:
Two wooden skewers
Scrapbook paper or printed digital scrapbook paper
Twine
Two buttons
Hot glue
Directions:
Fold paper in half and cut triangles. They will fold over the twine.

Tie a bow at one end of a piece of twine. Glue it to the top of the skewer. (Cut your skewer to the height that you want first.) Tie a bow in the other end and glue that one too.

Place the triangles over the twine and determine placement. Add a folded rectangle with a printed label if you like. Glue each triangle together with a bit of glue near the twine too.


Chalkboard Glasses
With some painters tape, the chalkboard spray paint from a previous project, some plastic wrap and some cheapie glasses, I'm ready for a party!!
Just tape plastic wrap on the glass, leaving a space open to spray paint. I just made a simple rectangle. I'm sure you can cut the edge of the tape with decorative scissors to make it more fancy and fun, but I was impatient!
Make sure the entire glass is protected from the overspray. If you do have overspray on other parts of the glass, just use acetone nail polish remover to take it off.
I attended a wedding where the paint was brushed on. I haven't ever tried it - but that might be an option as well.
I attended a wedding where the paint was brushed on. I haven't ever tried it - but that might be an option as well.


Flea Market Basket
I used some simple, inexpensive materials to decorate this basket. I can pull it all apart if I want to or repurpose it into something different. Maybe the next version will be hanging on the wall....
I used:
Walmart brand Mainstays pint canning jars
Burlap
Scrap material
#30 Jute Twine
Epsom salts
Small candles
Directions:
1. Start with your basket.
1. Start with your basket.

2. Cut a strip of burlap long enough to wrap around the base. Hot glue one edge over the other. I folded the top edge under to make a clean joint.

3. Cut a strip of fabric long enough to wrap around the base on top of the burlap. Fold and glue the same way.

4. Wrap the twine around the material several times and tie in a bow or in a knot.

5. Fill the jars halfway with Epsom salt.

6. Add the candles and flowers or whatever you choose. Voila!!

Springtime Dryer Sachets
This project is very simple.
Materials needed:
Fabric scraps (each sachet requires two 6"x6" squares)
Sewing machine
Herbs and petals from the garden (dried or fresh)
Procedure:
1. Make a template or pattern. I cut a piece of tagboard to the correct size and pinned it to two pieces of fabric, then cut.

2. Putting right sides together, sew almost all the way around 3/8" from the edges with the exception of about an inch on one side.

3. Trim the corners.

4. Turn right side out and use a knitting needle or chopstick to push the corners and seams out. Iron.

5. Fill with the herbs and petals. (Caution: If you use fresh items, inspect them carefully for little critters. I rinsed my items first and gently toweled the water off. There were a few teeny tiny caterpillars hidden away!!)


6. Sew completely around the square 3/8" from the edges. When I got to each corner, I left the needle in the fabric, lifted it and tapped it a bit to get the filling away from the seams. This edging will close the opening.

7. Use, or give away as a cute springtime gift!
Mercury Glass Candle Holder
This project is very simple.
Materials needed:
Krylon "Looking Glass" or "Chrome" spraypaint
Painter's tape
Vinegar
Spray bottle
Directions:
1. Tape off the top edge of your glass item. (I taped around the outside edge and folded it over the top.

2. Spray the inside of the item with half and half vinegar and water solution. The paint won't stick to the droplets.


3. Do a second coat of the vinegar/water and spraypaint.

Spring Burlap Banner
This project may take a couple of hours to complete. Please check out the website listed in the post to see another version of this banner.
Materials needed:
One yard of burlap
Five or six pieces of fabric - maybe 1/4 yard of each? I bought the "fabric quarters" at JoAnn's
5' piece of 3/4 inch ribbon - I used grosgrain
5' piece of 3/4 inch ribbon - I used grosgrain
Pellon iron on adhesive
Computer/Printer
Directions:
1. Fold a piece of 8 1/2 x 11 paper lengthwise. Cut 1 3/4 off of the bottom. Line up the opposite corners and cut. You should have a nice triangle.
2. Cut out two triangles (at the same time) out of burlap for each letter.

3. Cut a strip out of each colored fabric that is about 22" x 1 1/3". You will be making bias tape to go around each triangle.

4. Fold the strip in half lengthwise and iron. Fold each side in to the center to make bias tape.

5. Print up the letters that you can find on the Twist Me Pretty website. They are printed backwards so you can trace them on the paper side of the Pellon.


5. Cut the letters apart and iron a letter on the back side of each color of material. Cut the letters out and peel off the paper so that you've created an iron-on letter.

6. Iron the letters on the triangles. The bottom of my letters were about 3 1/2 inches from the bottom point.


7. Sew the bias tape around the two sides of the of the triangle.


8. Stop before getting to the point. Take the triangle off the sewing machine, do the special fold (see Twist Me Pretty for more details), then finish the other side.
9. Fold the ribbon in half - iron.
10. Place the triangles the way you want them. Put the folded edge over the tops of the triangles and sew.

11. Use the flower pattern to cut out flowers from each color of fabric. Place them on the ribbon edge in a pleasing pattern. I used a stationary zig zag stitch to attach them to the ribbon.


This is a great project! On a scale of 1 to 5, 5 being most difficult, I'd give it a 2.
Materials needed:
Frame (with glass) I purchased an unfinished, driftwood type frame at Hobby Lobby. I didn't realize it at the time but it has a "shelf" for the chalk!
Blackboard spray paint
Buttermilk acrylic paint
Small "liner" paintbrush
Stencils (I used Martha Stewart brand)
Blackboard spray paint
Buttermilk acrylic paint
Small "liner" paintbrush
Stencils (I used Martha Stewart brand)
 |
Directions:
1. Disassemble the frame. Take out the glass.
2. Paint the glass with two coats of spray paint.

3. Use the fake picture paper in the frame, or any paper that is the size of the glass, to make a sample of the stencil. I thought I'd try it first on paper before writing on the glass just in case I didn't like the placement of the letters. I did change things up a bit after seeing how it looked.


4. Using a pencil, stencil onto the glass. Not a lot of pressure is needed.


5. Using a liner brush and buttermilk colored paint, paint in the lines. Let dry for a couple of hours.

6. Using a piece of white chalk, "season" your new chalkboard by rubbing the chalk over it and wiping off with a soft cloth. Do it a couple of times. This will prevent it from becoming shiny and having the chalk not show up on it when you write.


7. Put the glass in the frame and hang.

Valentine's Day Cupcakes in a Jar
Please go to GloriousTreats.com for the recipe for this project. Directions on how I assembled them follow:

Bake either mix or website recipe cupcakes. I baked enough to make 24 C-in a-J.

Cut all the cupcakes in half. I cut off the top to flatten them first. Layer cake, frosting, cake, frosting, cake, frosting in each jar.

Use a stencil, or freehand, cut out two colors of hearts for each jar.

Write messages and punch small holes in them so they can be attached with twine.

Put lids on jars and cut lengths of ribbon for each. I hot glued the ribbon to the bottom with two small dabs of glue and to the top with another two dabs. That kept the ribbon from slipping off.

Tie the ribbons in a knot or a bow and then attach the tags with twine.
St. Paddy's Day Simple Banner
This simple banner was fun and easy. Like the Valentine's banner, you can change it up and modify it any way you like!
Materials needed:
Xerox copies of an "antique" map of Ireland (Google images)
Twine (I used green twine for this banner. I found it at ACE Hardware.)
Ribbon
ModPodge
Brown distressing inkpad
Small sponge
Green scrapbooking paper
Hot glue
Hole punch
Directions:
1. Cut the map copies into desired shapes. Mine were 7"x9".

2. Use Distress Ink to sponge around the edges to make them look older.


3. Put a coat
of ModPodge on the front. This will reinforce the paper when you punch
holes for the twine and it also gives the paper some weight.
4. While the paper dries, use a stencil or just freehand three hearts per map. It's okay to fold and then cut on the fold - the hearts are glued to the paper on the fold to make them stand out.

5. After the ModPodge dries, hot glue three hearts on each banner flag. Run a small amount of hot glue on the fold and press on to the flag. I used two shades of green for fun.


6.
Fold over a small edge (1/2") at the top to reinforce it. Punch four
holes for the twine. I made a template out of a blank sheet of paper so
all the holes would be uniform in all the flags.
7. Run twine in and out the holes leaving space between each flag. Tie a small piece of ribbon in a knot between each flag.

Voila!! You're done!

Valentine Burlap Banner


This is a quick and easy banner to make for any occasion. I chose squares for a traditional birthday banner, but you can switch it up any way you like - circles, triangles, hearts - with any message!


7. Cut a 6' piece of three types of yarn (or similar fiber). Fold in half and make a knot to form a loop. Braid the yarn until the piece is about 12" long. Knot the end and trim. Make two. Tie the yarn to the outside holes. I knotted it and had ends exposed similar to the other knots. The loop at the end will allow you to attach the banner.

Baby Baubles Baby Blanket
Note: Please see red additions to original instructions.
Materials needed:
Materials needed:
1/2 yard of burlap
Hot glue
Thick twine
Red paint
White paint (optional) or ModPodge
Red glitter (optional)
Buttons
Ribbon scraps
Fray check or sewing machine
Directions:
1. Using a piece of paper as a pattern, cut as many flags as you like (I used six).
2. Using either Fray Check (I chose to use a sewing machine and stitch the edges) to stop excessive fraying.
2.a. Use white paint to paint either a square on the front, or cover the front. This will stiffen the material. You may also omit the white paint, and ModPodge the flag (I did the back side) which will also have the same effect.
2.a. Use white paint to paint either a square on the front, or cover the front. This will stiffen the material. You may also omit the white paint, and ModPodge the flag (I did the back side) which will also have the same effect.
3.
Using a stencil (or freehand) paint a red heart on each flag. You can
use glue and put glitter on the red heart if you like. You can also
paint the flag white first, then add the heart. That might stiffen the
material a bit. If I were to do this project again, I would definitely
use the white paint.
4. Turn the flag over and hot glue the twine to the flag.
5. Glue buttons to the pointed ends of the flag.
6. Add ribbon knots to the twine between flags and tie knots at each end of the twine.
Happy Birthday Banner
This is a quick and easy banner to make for any occasion. I chose squares for a traditional birthday banner, but you can switch it up any way you like - circles, triangles, hearts - with any message!
Supplies listed below are for a 14 square banner. Please adjust as necessary.
You will need:
Plain color scrapbook paper for background (4 12x12 sheets or similar)
Patterned scrapbook paper for second layer (4 12x12 sheets or similar)
Black paper for letter background (4 12x12 sheets or similar)
Computer printed letters that are approximately 3 inches square or purchased letters
Fibers, yarn, ribbons of your choice
Paper cutter or scissors
Ruler
Hole punch
Glue (I use EK Success blue scrapbooking permanent adhesive)
Directions:
1. Cut out 5"x5" squares of plain color paper (I used scraps, so there is a variety of color. You can have them all the same as well.)
2. Cut 4"x4" squares of patterned paper (Again, I used scraps but you can have them all match.)
3. Cut 3 1/2" squares of black paper
4. Print up letters (or used purchased letters) and cut them out so they are 3"x3" square.
5. Glue the letter to the black paper, the black paper to the print paper and the print paper to the solid color paper. Hole punch both top corners.
6. Using your choice of fibers (I chose 3 grouped together) loosely knot each letter together. Trim ends.
7. Cut a 6' piece of three types of yarn (or similar fiber). Fold in half and make a knot to form a loop. Braid the yarn until the piece is about 12" long. Knot the end and trim. Make two. Tie the yarn to the outside holes. I knotted it and had ends exposed similar to the other knots. The loop at the end will allow you to attach the banner.
by Caron

The finished size is 36" x 42" using 40 oz of yarn, but if you use one of those giant skeins, the finished size is 33" x 33" which works just fine. You can download the pattern at the link below:
Button Ornaments

You will need:
- Styrofoam balls - I used the 4" ones
- Buttons (that goes without saying) - you'll need quite a few, especially if you double them up
- White headed pins
- Grosgrain ribbon
- 4" piece of wire
- Hot glue
Directions:
- Pin your buttons to the styrofoam. You can double them up and overlap them.
- Use the smallest buttons to fill in gaps if you see any.
- Tie a bow and hot glue it to the top of the ornament.
- Bend the wire into a "U" shape, stick it in the styrofoam and add a dab of hot glue.
Little Gifty Boxes

You will need:
- Brown paper boxes (they come in other shapes)
- Scrapbook or other decorative paper
- Ribbon
- Tags (these are canvas tags made by Maya Road)
- Mod Podge
- Hot glue
Directions:
- Measure the sides, top and inside bottom of the box. Use a paper cutter to make multiple pieces. I mixed and matched - all the sides are the same but the top is a coordinating pattern.
- Mod Podge the inside of the box. Put a piece of paper in the bottom (just for fun!) and cover with another layer of Mod Podge.
- Coat the outside of the box, press the paper pieces on and cover with Mod Podge. Do the same for the lid.
- When everything is dry, tie a ribbon bow around the lid. Put a small dab of hot glue under the bow and attach it to the lid.
- Turn the lid over and cut the ribbon. Trim each end so that it just wraps around the lip of the lid and hot glue them.
- Attach the tag to the ribbon - I used little "o" rings but you can easily tie it. I used a Sharpie marker to write on the tag.

Jolly Card Clips

- Clothespins
- Christmas themed scrapbook paper - 1 sheet
- Mod Podge
- Hot glue
- Greenery
- Leave the clothespins clipped to the cardboard when you remove them from the package.
- Cut strips of paper that are 1/4" wide and the appropriate length (mine were 1 1/2" and 3/4")
- Mod Podge the top surface of the clothespins, stick the pieces of paper on, then Mod Podge again.
- Hot glue greenery to the top.
You will need:
Directions:
Regular Guy Beanie

This is a quick and easy beanie. I used less than a skein for this - leftover yarn. You do need double pointed needles however (5 of them).
Girlie Beanie

You can use the pattern above to make a girlie version of the beanie. I used a thinner yarn and made an effort to pull it tighter throughout as I knitted. Previously I moved stitches from needle to needle at the end. Don't do that. Keep four needles until you get to the very end. It makes counting easier.
Simple Stocking

If you have a stocking handy, use that as a pattern. The size of your pattern will determine how much fabric you need. For my stocking I purchased:
1/2 yard of quilted Christmas fabric (I had PLENTY!!)
3/4 yard of coordinating trim
1 package of double wide bias tape
Directions:
- Fold the fabric in half
- Trace the stocking on the wrong side
- Cut two pieces at once
- Cut a 2 inch wide piece to go at the top of each side (turned over for contrast)
- Sew that piece and the trim on each side
- Sew the bias tape on the top raw edge to finish them
- Make a loop of bias tape and pin in the corner as you pin the two sides together
- Sew the two sides together (right sides facing)
- Clip the curves
- Turn right side out and press with an iron
- Fill with goodies!
Halloween Gifty Jars

I'm
sure you can use any size Mason jar for these - I chose the smallest
ones I could find. I bought a box of 12 at Walmart for around $10.00.
You will need:
- Jars - Mason jars or any other kind of jar you have around. I save the little jam and jelly jars from hotels and was thinking of using those somehow
- Ribbon - both themed ribbon and coordinating ribbon
- Stickers
- Decorative paper
- Tags of some sort
- Hot glue
Directions:
- Pop out the top of the lid. Cut a circle of paper and hot glue it together.
- Wrap decorative ribbon around the rim of the lid and hot glue it.
- Tie a bow with the coordinating ribbon, attaching the tag at the same time.
- Write on the tag or attach stickers.
- Add a sticker to the top of the jar. I bought these at Target in the Halloween party decoration sections. They were supposed to be used for drinking cups.


Comments
Post a Comment
Please feel free to comment - I would love to hear from you!