WHIMSICAL ROUND PILLOW EXPERIMENT
I have been following some very cool crafters on Instagram. This all started after attending the Renegade Craft Fair when it came to Los Angeles a couple of years ago. (Here is the link to their website.) I'd been to various craft booth things in the community, but this was a step up - these artisans create items that are amazing. From shoes to dresses to leather goods, artwork, ceramics and food, I was so impressed.
One of the blogs I started to follow which was a link from a feed to a feed to a feed on IG was Red Agape. The crocheted items are amazing and very inspirational. I can do basic crocheted baby blankets or afghans, but I've never completed a granny square or a crocheted circle. With the patterns and tutorials on that blog and on YouTube, I thought, what the heck?? I'll just START.
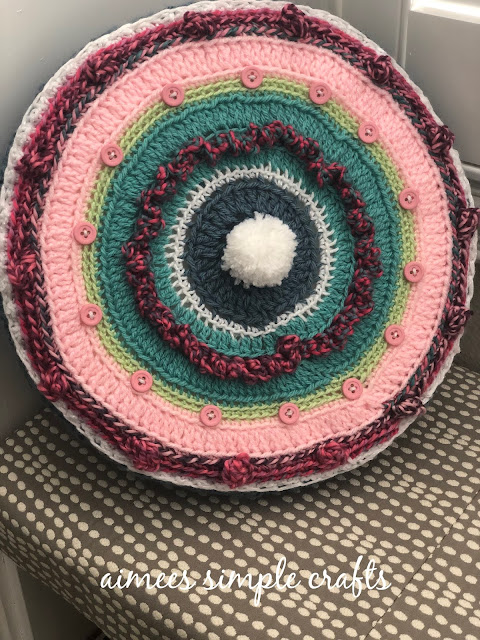
I pulled out some of the leftover yarn I had and looked up "magic circle" hoping to find a video of this technique for starting a crocheted circle. After sort of figuring it out, I went around and around with nothing in mind other than trying to keep the circles somewhat even. I changed up the colors and tried different stitches - single crochet, double crochet, popcorn stitch... whatever caught my fancy. I kept going until the circle was 12 inches in diameter. I tied off the end.
For the edge, I crocheted a new piece that we six single stitches wide, then I double crocheted back and forth until the piece was long enough to go around the entire circle. I used a blanket stitch with yarn to attach the two pieces together.
For the back, I started again with the magic circle, then double crocheted the entire piece in one color. From a Red Agape pattern, I learned that you increase the circle by varying the number of stitches in each stitch... 1 - 1 - 2 - 1 - 1 - 2 etc. I certainly need to practice, but it turned out okay.
I had foam left over from the seat cushion, so I drew a 12" circle on the foam and using a box cutter, cut the circle. I stitched the back to the side around the foam.

I think the end result is a bit funky, but sort of cool. Not bad for a first try and kind of fun since there was no expectation of success! I added a few buttons just because and voila! A nice little addition to my bench under the window! I'm sure my supervisors (.... cats) will enjoy falling asleep next to it!
One of the blogs I started to follow which was a link from a feed to a feed to a feed on IG was Red Agape. The crocheted items are amazing and very inspirational. I can do basic crocheted baby blankets or afghans, but I've never completed a granny square or a crocheted circle. With the patterns and tutorials on that blog and on YouTube, I thought, what the heck?? I'll just START.

I pulled out some of the leftover yarn I had and looked up "magic circle" hoping to find a video of this technique for starting a crocheted circle. After sort of figuring it out, I went around and around with nothing in mind other than trying to keep the circles somewhat even. I changed up the colors and tried different stitches - single crochet, double crochet, popcorn stitch... whatever caught my fancy. I kept going until the circle was 12 inches in diameter. I tied off the end.
For the edge, I crocheted a new piece that we six single stitches wide, then I double crocheted back and forth until the piece was long enough to go around the entire circle. I used a blanket stitch with yarn to attach the two pieces together.
 |
| I used the white yarn to blanket stitch the side to the front |
For the back, I started again with the magic circle, then double crocheted the entire piece in one color. From a Red Agape pattern, I learned that you increase the circle by varying the number of stitches in each stitch... 1 - 1 - 2 - 1 - 1 - 2 etc. I certainly need to practice, but it turned out okay.
 |
| I certainly haven't perfected the connections between rounds, but it was a decent first attempt |
I had foam left over from the seat cushion, so I drew a 12" circle on the foam and using a box cutter, cut the circle. I stitched the back to the side around the foam.

 |
| I used a blanket stitch to stitch the back and side pieces together |
 |
| This shows the double crochet as well as the single crochet stitches. Yarn was just tied from color to color since none of the ends would show. The "ruffle" is just a single crochet with four more loops, then single crochet. Directions for making the popcorn stitch are plentiful online. |


Comments
Post a Comment
Please feel free to comment - I would love to hear from you!